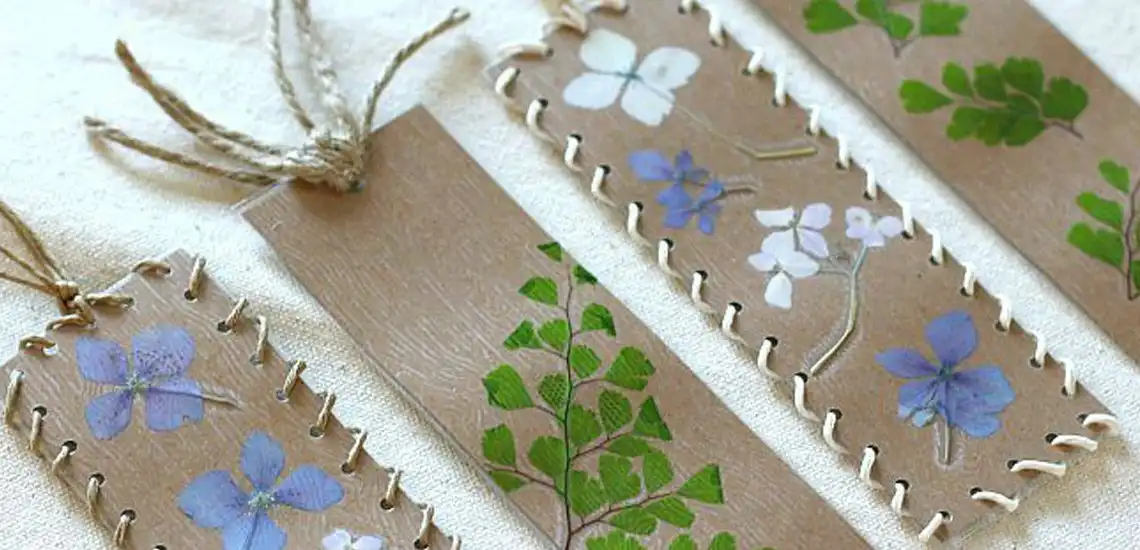
Arrow IconGo Back
blog banner

5 Mother’s Day Crafts You Can Make With Your Kids

We need to look no further than our very own home to find an everyday superhero. Mama, whether you're cooking up meals, helping out with homework, kissing boo-boos or off at the rat race, it's nothing but awe we have for you. Your little ones feel the same and would love nothing more than to show some appreciation for you. So we've rounded up some cute crafts you can do together for Mother's Day.

1. Mothers Day Handprint Art Flowers

This handprint craft is PERFECT for mom whether you're making it with just one pair of hands or, if you are making this at home with handprints from all siblings or all family members. WHAT YOU'LL NEED Non-toxic washable paints Green paint Paint & paintbrush White paper (2x) Scissors Glue Ribbon (optional) STEP 1 Pick your favourite colour and either paint your hands by using a paintbrush or dip your palms in paint. STEP 2 Press down your hands on white paper (pretty hard) and then, in one swift motion remove the hand to make the handprint. Make one, two, three, four or more handprints in one or more colours. STEP 3 Let the paint dry. Once dry, cut along the handprint. STEP 4 Glue the handprint on a sheet of paper or canvas. STEP 5 Draw flower stems with green paint (or marker). Decorate with a bow and write your Mother’s day message. Image/activity credit: easypeasyandfun.com

2. Ice Cream Stick Earring Stand

No matter what your little one makes for you, you'll cherish it. But if your kiddo wants to make something useful for your wardrobe, this cute craft is just the thing to make together. WHAT YOU'LL NEED Around 10 cleaned ice cream sticks Paint and paintbrush Strong gel glue STEP 1 Paint the ice cream sticks. Let them dry properly, and spray them with aerosol varnish (optional). STEP 2 Glue 4, 5 or even 6 sticks (depending on the number of earrings you want to hang) horizontally between two other vertical sticks. Make sure to follow the instructions for the glue you are using, especially regarding the complete drying time. STEP 3 Then form a triangle on each side of the "grid" with two more ice cream sticks. A small amount of strong glue is enough to stick, however, it will be necessary to firmly hold the sticks a few minutes before the gel sticks well (it is important to have a glue in the form of gel, in order to form a real point of glue where to apply the ends of the ice cream sticks). STEP 4 Be sure to let it dry several hours before hanging your earrings Image/activity credit: modesettravaux.fr

3. Pressed Flowers and Leaves Bookmark

Got a mama who likes to read? Then this pretty nature-inspired bookmark is sure to put a smile on her face. WHAT YOU'LL NEED Various leaves and flowers Cardstock Scissors Glue Contact paper or laminator Single hole punch Yarn, string, or raffia ribbon STEP 1 To make this bookmark craft, you’ll need some pressed leaves and flowers. Here’s how you can press them: - Take a nature walk or head into your own backyard and pick some small flowers and leaves. - Press your flowers and leaves by placing them inside the pages of a thick book for 3-4 days. - Once your flowers and leaves are pressed and dry, carefully remove them from the book. STEP 2 Cut some cardstock the size you’d like your bookmark to be. STEP 3 Use your pressed flowers and leaves to make a design on your cardstock. Once you’re happy with the design, you’ll want to lightly attach the flowers and leaves to your bookmark before you permanently cover them up. STEP 4 Next you’ll want to cover the bookmarks with plastic to protect them during use. You can use a personal laminator (if you have one), but you can also cover your bookmark with clear contact paper. STEP 5 Once you’ve covered your bookmark, trim off the excess plastic. STEP 6 Now it’s time to add the finishing details. Use a small single hole punch to punch holes around the border of bookmark. Then thread some cord around the border and tie it off at the top. If you prefer to keep it simple, you can just punch a single hole at the top for your cord. Image/activity credit: buggyandbuddy.com

4. Mom You Rock Craft

Rock paintings are such a classic craft for the kiddos. Why not have them paint special rock portraits for mom this Mother’s Day? WHAT YOU'LL NEED Rock Paint Paint brush Old gift/jewelry box STEP 1 Find a rock big enough to paint a face on STEP 2 Paint your rock to look like your mom STEP 3 Once dry, place the rock inside a repurposed jewelry or gift box and wrap a bow around it. Image/activity credit: mermagblog.com

5. Egg Carton Flowers

Abstract art doesn't get cooler than this. Super simple, and super fun this activity will have your kiddos wanting do endless combinations. WHAT YOU'LL NEED Acrylic Paint Egg Carton (not foam) Paper Straw Pom Poms Scissors Glue Paint Brush STEP 1 Have an adult cut out four containers out of the egg carton. Trim around the edges so that it gives it a rounder shape for the petals of the flower. STEP 2 Squirt some acrylic paint colours onto a paper plate and have the kids paint their flowers. Use any colours you’d like or use a pastel palate. STEP 3 After the paint’s dried you can attach the stem of the flower by gluing it to the back. Use a paper straw so that it is thick enough to hold up the egg carton, if you use something like a pipe cleaner it will just bend. STEP 4 Next choose a coloured pom pom and glue that to the center of the painted egg carton. Image/activity credit: iheartartsncrafts.com